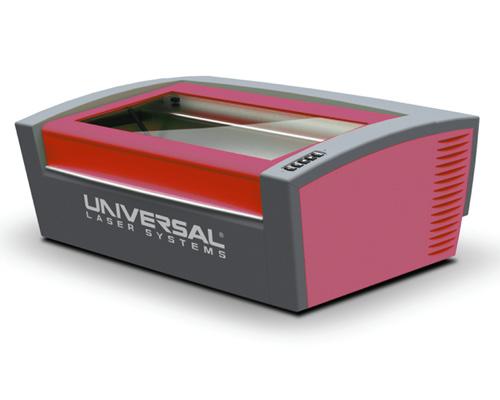
Universal VLS3.50 laser cutter
|
VLS3.50 laser cutter
|
|
|---|---|
 |
|
| Status: Active with limitations, contact the lab manager | |
Superusers
- Ivan Penskiy (ipenskiy@umd.edu)
Overview
The VLS3.50 is a compact 50-watt CO₂ laser cutter and engraver manufactured by Universal Laser Systems (ULS). It is capable of precision cutting, engraving, and marking on a variety of materials, including wood, acrylic, glass, rubber, and certain metals with specialized coatings.
Location
E.A. Fernandez IDEA Factory (Bldg. 228), room 3119.Laser cutter specifications
| Maximum Cutting Area (XY) | 610 x 305 mm (24 x 12 in) |
| Maximum Part Size (XYZ) | 610 x 305 x 102 mm (24 x 12 x 4 in) |
| Z Axis Lifting Capacity | 9 kg (20 lbs) |
Important documents and useful links
- VLS3.50 user guide
Reservation
VLS3.50 laser cutter must be reserved before using. The reservation is done using the Google calendar. Users will be able to reserve the equipment personally after attending the RML lab orientation and then following the steps below to gain access to the equipment.
TBD
Video demonstration
The following videos demonstrate capabilities and the some aspects of operating the VLS3.50 laser cutter:Important reminders
- You must turn ON the exhaust system AND the air assist system before starting any cut.
- If your material is catching fire, immediately lift the cover to stop the cut. Remove the burning material.
- Never cut new or mystery materials without consulting the superusers.
Material selection:
Make sure that the material you are planning to use is approved for laser cutting (see Table in the end).
Design for laser cutting:
Designs can be made in any software capable of saving graphics in vector format (e.g. CorelDraw, AutoCad, Adobe Illustrator, InkSpace, etc). The computer connected to the laser cutter has LibreOffice Draw installed so save files in one of the following vector formats (pdf or svg) and bring them over on a flash drive.
Log in to the VLS3.50 laser cutter computer: (Login: RRL Student, Pass: RRL2014).
If you want to save your files on the local drive, create your folder in “User Designs\'your advisor's name'\'your name'” (located in "Desktop" folder) and save them there.
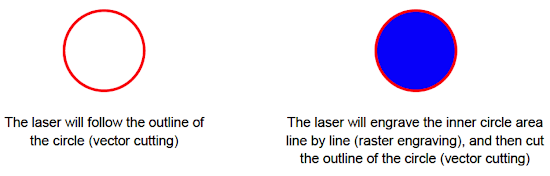
The VLS3.50 laser cutter is capable of vector cutting and raster engraving materials.
- In the vector cutting mode, the laser follows each outline of the design from beginning to end. This method of cutting is advantageous when you are cutting out parts because it produces a smooth clean cut at a fast speed.
- In the raster engraving mode, VLS3.50 rasterizes the design and engraves it line by line (as an inkjet printer) firing 1 dot at every pixel in your drawing. This method should not be used to cut out parts but is the only way to engrave solid areas, text and intricate patterns and textures.
The mode of operation is chosen based on the color of the design. Use the following standard when making designs:
- RED – for vector cutting;
- BLUE and BLACK – for raster engraving;
- Always create your files using the RGB color mode!
Note: thick RED lines will be treated by the software as engraving area, set thickness close to zero (e.g. 0.01 pt).
Transferring designs to the laser cutter:
- Open your files in LibreOffice Draw.
- Make sure all your vector lines are 0.001 thick, and all your colors are in RGB.
- Choose "Print" in the "File" menu.
- Make sure the printing output is set to VLS3.50, other default settings should be correct.
- Click "OK"
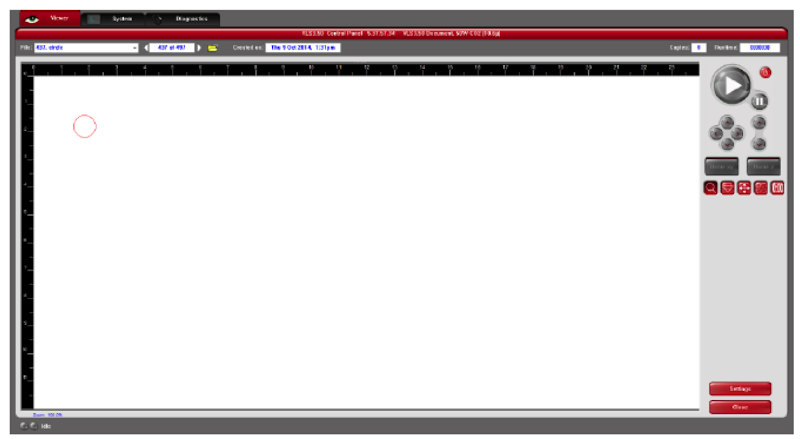
- Open UCP software (the shortcut is on Desktop). The laser cutter software should open with your design in it
Laser cutter settings:

- Measure the thickness of your material.
- Turn ON the laser cutter using software (see Figure above) or the button on the front panel.
- Wait until the laser cutter initializes.
- Adjust the initial Z-Axis (vertical) position of the cut bed according to Excel spreadsheet. If in doubt, move the cut bed to height equal to the material thickness.
- Open the laser cutter lid and place the material on the cut bed.
- Position your design by using the "Move" button (see Figure above). To ensure the position is correct relative to the material placement, move the laser head to a desired location on the cut bed by selecting the laser head movement button (see Figure above).
- Go to "Settings" and select "Manual Control".
- Set the appropriate "Power", "Speed", and "Z-Axis" settings for each layer. For the recipe Z-Axis value use the measured thickness of your material or the value from the Excel spreadsheet.
- Don’t press Enter, instead click "Apply" after you entered all setting for each layer.
- If you want to skip cutting/engraving some layers, choose "Skip" in the "Mode" drop-down menu.
- Click "OK".
- Go to the "Settings" menu again to double check all your settings

Starting the process:
- Open the compressed air valve #2 on the wall above VLS3.50 laser cutter. You should hear the hissing sound and and see the manometer reading around 30 psi.
Important: If the manometer reading drops below 10 psi at any point the laser cutting process, ABORT the process immediately and inform the superuser. - Turn ON the fume exhaust (under the table with VLS3.50) using the switch on the back panel. Wait for 20-30 sec for the flow rate to stabilize.
- Click the big green “Run” button to start cutting process.
- When you are finished turn OFF the fume exhaust, and close the compressed air valve #2.
- Remove all parts and debris from the cut bed. To pick up small pieces use tweezers (should be on the same table).
- Turn OFF the laser cutter, close the lid, close all your files (except the Excel spreadsheet) and lock the computer.
Troubleshooting:
Email the lab manager (Ivan Penskiy, ipenskiy@umd.edu) about all issues with the laser cutter, even if you were able to resolve them.
- Laser won't turn on: This is generally a computer glitch. Disconnect the USB cable on the back of the laser, restart the computer, and plug the cable back in.
| Material | Approved? | Notes |
|---|---|---|
| ABS | Caution | Releases HCN (cyanide gas) according to some sources. Consult a superuser before using. ABS does not cut well in a laser cutter. It tends to melt rather than vaporize, and has a higher chance of catching fire and leaving behind melted gooey deposits on the vector cutting grid. |
| Acrylic/Lucite/Plexiglas/PMMA | Yes | Cuts and engraves cleanly and quickly with near-polished edge. Careful, can be sharp. Some fumes may linger in the air. |
| Carbon fiber mats/ewave | Yes | Can be cut, very slowly. Carbon fiber has to be without epoxy coating. |
| Cardboard, carton | Yes | Cuts well, but may catch fire. |
| Delrin/Acetal | Yes | Cuts and engraves cleanly with slightly smooth edge. Use knife or sandpaper to remove rough edges. Light powder is left near cut or engraving. Clean it with compressed air, a soft brush, or water. |
| Depron foam | Yes | Used a lot for hobby, RC aircraft, architectural models, and toys. Cuts nicely with a smooth edge. Must be constantly monitored. |
| Fiberglass | No! | Releases fumes from epoxy. Glass cannot be cut, only engraved. |
| FR4/PCBs | No! | Releases toxic fumes and abrasive particles. |
| Gator foam | Yes | Foam core gets burned and eaten away compared to the top and bottom hard paper shell. Must be constantly monitored. |
| Kapton tape (polyimide) | Yes | Works well in thin sheets and strips like tape. |
| Magnetic sheet | Yes | Cuts well (although depends on magnetic material). |
| Many woods | Yes | Avoid oily/resinous woods, they can catch fire. |
| Metals | Caution | Cannot be cut except for very, very thin sheets. Limited marking ability. Consult with a superuser before proceeding. |
| Non-chlorine containing rubber | Yes | Cuts well. |
| Nylon | Yes | Although laser cutters can easily cut through nylon, the material may come out messy. |
| Paper, card stock | Yes | Cuts very well on the laser cutter, and also very quickly. |
| Plywood/Composite woods | Yes | These contain glue, and may not laser cut as well as solid wood |
| Polycarbonate/Lexan | No! | Releases pungent fumes. Heavily absorbs IR radiation and therefore a very poor choice for laser cutting. |
| Polyester/Mylar | Yes | Mylar works well if it is thin. Cut with low power, high speed, multiple passes to minimize melting. |
| Polyethylene/HDPE | Caution | Melts badly. Does not cut cleanly. Consult with a superuser before proceeding. |
| Polypropylene | Yes | Some melt, slight discoloration. Recommended to cut thin (under 1 mm) sheets. |
| Polypropylene foam | No! | Like polystyrene, it melts, catches fire, and the melted drops continue to burn and turn into rock-hard drips and pebbles. |
| Polystyrene foam | No! | It catches fire, it melts, and only thin pieces will actually cut. This is the #1 material that causes laser fires!!! |
| Polyurethane | No! | Releases toxic fumes. |
| PVC (Poly vinyl chloride)/vinyl | No! | Emits pure chlorine gas when cut. Will ruin the optics, cause the metal of the machine to corrode, and ruin the motion control system. Very bad idea. |
| Teflon (PTFE) | Caution | According to some sources, this releases fluorine gas. Consult with a superuser before proceeding. |
Shutting down procedures
- Finish the print job.
- Turn OFF the exhaust system.
- Turn OFF the air assist.
- Turn OFF the laser cutter.
Gaining access to equipment
- Preparation:
- Read the manuals for VLS3.50 laser cutter.
- Read the SOP and File preparation sections.
- Make sure you know answers to the following topics:
- How the lens can be damaged?
- How to focus the lens?
- What materials can be cut in this laser cutter?
- Safety considerations (what to do when there is flame, laser safety, ...).
- Order of operations.
- Turning on the exhaust and air assist systems.
- How to show where your drawing will print without using the laser.
- Setting the power levels.
- Power vs. PPI vs. speed.
- Prepare material for cutting.
- Scheduling:
Once you are confident in the topics from the previous section, email the lab manager (Ivan Penskiy, ipenskiy@umd.edu) to schedule training. Usually it takes 1-2 30-45 min sessions to become an authorized user.